Showing posts with label raised beds. Show all posts

Friday, September 19, 2014

Autumn Haze


I love Autumn. The dusty, musty smell of the soil winding down in the garden for the year. The low slung golden light filtering through leafy trees just beginning to give in to the inevitable lack of light that will turn their trusses into a fiery crown. Falling to the ground, their beauty spent, their leaves will nourish the next flush of  green with the warming of days next spring.

The early morning garden had started shrouded in fog. I now look across this little farm where the holly hocks stand guard at the garden gate the setting sun  turning their blossoms into little panes of stained glass more beautiful than any church window. Beneath them between the lavender and the rosemary I can see divots in the soil where the chickens spent the afternoon happily tossing dust a foot or more into the air as they took a languorous dust bath. I make a mental note to repair them. For what purpose I don't know. They will only be at their happy destruction again tomorrow. I don't mind. I love having animals that are so obviously happy and healthy. I call the masses home with a "chook chook chook" and lock them safely into their run. They seem to  visibly relax once tucked inside, searching for bits of food or just resting in a corner, waiting for the sun to tell them it is time to go to bed.

Picking up my basket I head for the garden to see what the days offerings will be. Tomatoes perhaps.  Green tomatoes for sure but I'm not quite ready to give up on the possibility of a late flush of ripe tomatoes and another Caprese Salad (recipe follows) before cold weather takes these little beauties. If there are enough I can dehydrate them for using on pizza in the dead of winter. Yum! Summer in January!

Zucchini would be great too. I discovered that my family will eat all the
zucchini I can grow when I make baked Zucchini Fries. (Recipe to follow) I see spots of orange peeking out from under giant prickly leaves and make another mental note to write in my garden book to plant more pumpkins next year. They are so much fun and a versatile calorie dense vegi that stores amazingly well if not allowed to get too cold.

Green beans dangle from tangled vines and I pick the garden's offering. Pencil thin and straight french fillets and big fat Blue Lake beans. There is also tender wax beans and a collection of long purple beans. They will turn a deep green when steamed but it is always fun to bring a basket of multicolored beans into the kitchen. Boring vegis are not in our repertoire of daily fare at this time of year. The beets I planted in August look gorgeous with their ruby colored stems glowing in the setting sun and the ferny foliage of new carrots as a backdrop. They will be a tasty dish this winter. The beets need thinning in order to have room to become beets so the "culled" leafy greens will  be dinner tomorrow. I leave them until then.

Walking back toward the gate I spot some small pear shaped tomatoes hiding under the skirts of a protective branch. I pick one and pop it into my mouth enjoying the sweet acidic explosion on my tongue. I haven't any lettuce or greens big enough to make a salad but decide a small bowl of plain naked tomatoes would be just the ticket. Better than a candy dish without the guilt.  

Picking up my basket I trudge toward the house with my booty wondering if we will get tired of green beans before they are done for the season and if they will taste nearly as good when I use the frozen beans that I have put by.
In the kitchen I pour the beans into a large bowl to sort into beans for dinner and beans for pickling. Shining jars of peaches have cooled and sealed on the counter and are waiting to be labeled and added to the growing larder in the pantry. Partly ripened tomatoes are covering every available surface including an extra table that I have set up specifically for that purpose. Not trusting the weather I brought in all the tomatoes except the Pear and the Pacino's to ripen in the house. This year I am going to beat the blight to the harvest. I place these tomatoes into a zip bag as they ripen and place them in the freezer to be turned into sauce later. The smell of blackberry jam is still heavy in the air and reminds me of my mothers late summer kitchen. All this is a lot of work now but so easy this winter when I need a jar of something to round out a meal and I don't even have to go to the grocery store. I take the peaches out to the pantry and admire the colored jewels preserved in gleaming jars.

 I'm tired after the days work but it is a happy contented tired. The kind that means you will fall asleep tonight and sleep clear through until morning and wake up ready to do it all over again. Perhaps tomorrow I will try making green tomato relish right after putting out eggs and a few bags of green beans for my customers that make the long trek down our dusty driveway. It's fun to share the harvest and see the appreciation on other peoples faces. My only regret about the waning summer is that I didn't find the time to use the hammock set up in the front yard. So tomorrow morning I will make it a point to enjoy a steaming cup of coffee on the front porch and admire the turning of the season before starting my day.

Baked Zucchini Fries

Italian seasoned bread crumbs
Grated Parmesan cheese
Seasoned salt
Zucchini
Olive oil or egg whites (depending on your diet egg whites can be used in place of oil)

Preheat oven to 425 degrees. Line a baking sheet with parchment paper or foil
Combine bread crumbs, cheese, and seasoned salt in a pie plate. 

Cut the zucchini in half length wise and remove seeds. Slice into 1/2 x 1/2 x 4 inch pieces and place in a large bowl. Drizzle oil over the zucchini and quickly toss with your hands. (Zucchini absorbs the oil)

(Or beat egg whites just until frothy and toss with zucchini).

Press zucchini into crumbs gently shaking off excess and place onto the prepared baking sheet.

Bake in preheated oven until the fries are golden and tender about 15 minutes. (I find that a convection oven makes them even crisper.)

Serve with catsup, sweet chili sauce, or just plain.


For those that don't know what a  Caprese Salad is here are some directions. (my youngest calls this leaves and cheese)

Caprese Salad

Fresh garden tomatoes sliced about 1/4 inch
Fresh basil leaves
Fresh Mozzarella cheese slice about 1/8th to 1/4 inch
Your favorite olive oil and vinegar type salad dressing. (ceasar works)

Alternate tomatoes, leaves, and cheese in a circle around the edge of a plate piling left overs in the middle to make an attractive display. Drizzle with dressing. Let marinade for at least 15 minutes before serving. You can also drizzle a thin line of balsamic vinegar along the salad.


Wednesday, September 26, 2012

A Winter Garden? Everyone Should Have One

Last years Cheddar Cauliflower 
Ok. I know your tired. Fall and winter you are looking forward to a little down time and book time, holidays, etc. But if you happen to think about it you can get a fall garden started. It is just a little bit closer to being more prepared and self sufficient. I have chosen to put in some basics for the winter. Cauliflower, three different varieties of broccoli, beets, carrots, lettuce, and maybe some spinach. Although I think I am a little late for the spinach I will try it in my cold frame.

Here in the Northwest cool weather crops are the only thing that will grow with a little protection. I don't want anyone to think I am some expert because just about everything I do is an experiment but I have had some pretty good results. Last year I grew broccoli, brussel sprouts, and a variety of cauliflower called Cheddar that was to die for. I also grew a variety called snow crown with terrible results. I didn't know you had to "blanch" cauliflower or that there are self blanching varieties. I didn't even know what blanching was but I do know it doesn't mean using hot water.  Apparently when cauliflower gets to be about baseball size you are suppose to wrap the leaves around it and hold it in place with something like string. This protects it from the sun and helps it turn white. Turning white was not a problem for me. Knowing when to harvest was. Harvest when the heads are about 6 inches in diameter otherwise they get a ricey look and are past their prime. Since I lost my cauliflower to hard frost I think perhaps this is a better reason to blanch.

This year I put in some simple raised beds to make the job a little easier and to battle the constant crappy soil. I bought three pieces of 2 x8 x8 foot Douglas fir and cut one in half for the ends so the bed would be 4 ft. by 8ft. I didn't want to use treated lumber and cedar was just too darned expensive. So following the lead of my friend Cindy, I applied boiled Linseed oil to all surfaces and let it dry then had the man screw it
Beets in the foreground carrots in the back
together for me with 2x2's in the corners. I filled, fertilized, and planted beets and carrots in it and did it in August. A little late for beets so I chose a fast maturing variety called Merlin (55 days) and another that I had in my seed file called Chioggia (65 days). Beets and carrots were direct sown into the first raised bed about mid August. Although I had doubts about the beets due to the late planting they are doing great. I planted thick enough that we have had two meals of beet greens. Not bad for a four foot square planting. During August in spite of my attention to watering, my beets would wilt slightly during mid day. Too much sun. So I placed a piece of 4 x 8 lattice on the west side of the raised bed held in place with three metal fence posts and plastic ties to hold the lattice to the post. Worked perfectly. No more wilting. My carrots need thinning but look great. The beets have formed little one inch beets already. The only thing I would do differently is not use so much compost. I can see the beet roots are going to be somewhat hairy.

 Around here you need to plant your fall and winter gardens in late July and August to allow for adequate growth prior to the onset of fall. The difficulty comes with the fact that you are planting cool weather crops and it is still hot at that time of year. So it is very important to water, water, water. If you let broccoli and cauliflower dry out even once it will bolt instead of growing. Because I was building the rest of the raised beds at the time I needed to be planting them I opted to start the Cole plants in pots on my patio. My patio gets morning sun until about 1pm then it is in shade the rest of the day. A perfect place to start cooler weather plants. I also put the pots in flat pans so that the pots could sit in a 1/2 inch of water lessening the possibility of drying out when I forgot to water. When transplanting be very careful to not disturb the roots as this will cause a set back in growth.

I went ahead and put in two more raised beds that were 4x12. These I am using for the Cole crop and because I grew the plants in pots I had a ready made garden as soon as I was able to fill the bed with soil. This time I used a three way mix from the local soil company.

One of the things I don't like about Cole crops is the green caterpillars and aphids. The caterpillars are the larvae of the white cabbage moth or butterfly.
You will see them flitting around your garden looking for a spot to lay their eggs on your lovely broccoli. Brussel sprouts seem plagued with a grey aphid. Both are a real pain. The caterpillars can be controlled with a couple doses of BT but not only do I not relish the thought of eating that stuff no matter how harmless I also don't like paying for it. So I came up with this idea. As soon as I plant the broccoli, cauliflower, and brussel sprouts I cover them with nylon netting that I purchased at the fabric store last year. Not to be confused with tulle. It's cheaper than row covers or tulle and does the job. (Tulle also blocks more light than the nylon netting.)  Not one greenie meanie. Last year when it got cold enough that the butterflies where no more I took the cover off. Unfortunately the grey aphid attacked the brussel sprouts when I did so this year I am leaving the cover on all winter. According to my companion planting book Cole crops do well with onions so I planted some bunching onion from seed between the broccoli and cauliflower in the hopes of getting green scallions for the winter.  They are just starting to come up and are about 1-2 inches tall. Nice thing about planting in the fall is everything seems to germinate faster and better. The bad thing about my set up is the onions skinny little spikes want to grow up through the netting because it is just gently laying on top of the Cole crop. So I placed some hoops to hold the netting up off the soil. I sure don't want those onions to grow through that and have to either cut them out or rip them off. In general I am pretty happy with the job I have done so far. I will plant the cold frame with lettuce and spinach and then relax a little and just do some clean up and weeding and putting the rest of the garden to bed for the winter. The chickens and ducks will be invited in to the garden to clean out any lingering pests. Then I can get started cleaning and winterizing the coop. Guess I wont be relaxing after all. Hmmmmm.

Sunday the oldest came home with her boyfriend to partake in a small family tradition. We celebrate the first day of fall with a family dinner. We had a pork roast on the rotisserie and a Caprese salad, acorn squash baked with butter, brown sugar and a slice of bacon, Zucchini and potato fries then topped it all off with home made pumpkin pie. We even had a little goat milk ice cream. All out of our garden and home made. (The goat milk was from a local farmer) Of course I forgot to take a picture so here is a picture of the table instead. Both of our girls start school the next day. First day at junior college for the youngest and first day as a junior at the University for the oldest. There are many things to celebrate.

http://homesteadrevival.blogspot.com/2012/09/preparedness-challenge-39.html#comment-form


Sunday, May 29, 2011

Memorial weekend! Yay!


Memorial weekend. The Man has three days off in a row and we are taking one of those days to go for a ride on the Harley. I spent most of Saturday outside in the garden mostly building up the potato towers. (see march 8th blog, Fifteen days and counting) I did most of them with the straw and then had an idea. Why couldn't you line the towers with brown paper bags from the grocery store? They still hold in the soil and they go in faster and leave more room for growing in the towers and they compost. After having to buy a bale of straw at $9 it is also a lot cheaper. So I did two with bags as an experiment. I guess the down side of that is the bags wont add as much compost at the end of the season. Decomposing straw really adds a lot to soil but at $9 a bale I think I would rather spend my money on compost.


Earlier I had started peas in the house in toilet paper and paper towel tubes cut into 2 inch sections and placed in a cake pan or flat plastic container. I added soil and one pea per tube and kept them watered with the intention of planting them in the garden with the tubes. One container had a paper liner in the bottom. Not a good idea. The pea plants like to attach themselves to the paper on the bottom and it is hard to pull them off. The other container had no paper liner on the bottom and the roots just slid right off and I was able to plant them with a minimum of disturbance. I also grew them under a grow light and noticed that after awhile the paper tubes gave off a moldy odor. (They went out on the porch after that). But at least I have a row of peas that will hopefully produce something. The rest I planted in the garden in the normal way even though it was late.

My original 6 chicks that were raised by my Buff Orpington are now teen agers. They are still trying to find their place in the flock. The four Americana's will lay pretty green/blue eggs and make a lovely dozen  for my customers. The other two are Dominique's a breed on the endangered list. The one with the scissor beak will probably not be much of a layer but is such a pet now that she thinks she can fly up on my shoulder any time she wants. She is all personality.

The two silky mom's are busy raising their brood together. They definitely know which chicks are who's but seem to have reached an agreement to not fight with each other and that makes my job easier since I only have one chicken tractor to put them both in during the day to keep them safe from the other birds.


With all these pictures this post wouldn't be complete without a picture of the geese.


This next week promises to be very busy with a 16th birthday coming up. Because the man and the oldest girl have unusual work and school schedules I am having to do different birthday things on different days. One day will be a family dinner at home with the requested home made mac and cheese and a chocolate cheese cake for the birthday cake. Then the hard stuff will be done on two other days. I will let you know how that turns out.

Monday, April 11, 2011

Little Mother, Big Babies, Cold Spring and Rhubarb

My broody hen is proving to be a terrific mother. She is a Buff Orpington and I love that breed. They are good egg layers, lay well in the dead of winter, and are gentle friendly birds. They do seem to go broody too often for my taste but I just keep taking them off the nest and separating them from any thing that even resembles a nest for a couple of days and they get over it. I find there is a lot of information about brooding chicks artificially and very little about hens that brood chicks naturally. So far I recommend letting a hen raise chicks. You save a bundle in electric bills cuz mom keeps them warm. That 250 watt light has always put a spike in our bill. The mother also takes care of introducing the babies to the rest of the flock. A definite advantage. You do need a separate area that is dry and shielded from the elements where the family wont get bothered by the rest of the flock. I am using a dog crate located in the other half of my coup. I guess the down side of it is the chicks will be less people friendly but I am making a point of handling them to see if that makes a difference. And she lets me because she has been handled by me since she was a chick. Sure she still puffs up like a balloon and even gives me a peck once in awhile but then sometimes she doesn't seem to mind at all. There are a few things you have to do with a hen that is setting tight on a nest. Make sure you get her off the nest once a day to eat, drink, and do a poo and watch to make sure they do because they will try to get right back on.They will set until there is nothing left of them and even if you get them to take a daily break you will
Mom showing babies how to take a
a dust bath. 

find that they lose an alarming amount of weight. Even after the chicks have hatched (or you have slipped chicks under a hen in the dead of night) you have to get her off the nest once a day. She wont leave the nest until she thinks her brood can or will follow. That takes a few days.

So in a previous blog I mentioned that I was going to try sweet potatoes in the garden this year. However, everything I have read about growing them says you have to go to a lot of effort to warm up the soil in northern gardens before hand. This wouldn't be a problem normally except we are having the coldest, wettest spring since 1954. I am having a problem just trying to get the garden ready for peas and lettuce. We even had two days of snow (it didn't stick around long) last week. So maybe next year. I have started tomatoes even though my pessimistic brother says I won't get any of those either. I will prove him wrong unless our "Climate Change" (AKA-global warming) dumps a blizzard on us in July.

My goslings and ducklings are growing inches every day. I now have behemoth birds with downy fur that still can't be turned outside in the cold wet weather. Even though they are big they have no protecting oil coated feathers yet and get easily chilled when wet. It's a good thing they don't jump or perch on the side of their box or they would be out of it a long time ago. This box is at least 2 ft. high and they are still peeking at me over the top. I let them out for a romp and some grass mowing in between showers but it hasn't lasted very long.

One of the things I look forward to in the spring is rhubarb pie. I have a type that is pink all the way through and sweeter than the green kind. I make jam and freeze some of it raw for winter and there is never enough. If you aren't a fan try this recipe. It will change your mind about rhubarb. The secret is the egg. You may need a little more sugar if you are using the green type of Rhubarb.

Rhubarb Pie
4 cups rhubarb, in bite size pieces
1 1/2 cups sugar
2 eggs
1/2 cup flour
dash of salt
1/2 tsp. cinnamon

Make a double crust pie pastry from your favorite recipe. Mix sugar, eggs, flour, salt, and cinnamon and toss with rhubarb. Put filling in pie crust and top with second crust or lattice crust. Place pie on a cookie sheet to catch drips. Bake 450 degrees for 10 minutes. Reduce temperature to 350 and bake 30-40 minutes or until fruit is tender when tested with a fork. If crust browns too quickly cover lightly with a piece of foil.  This makes a great cobbler too. Just omit crust and use a crumble type topping before baking.

Monday, April 4, 2011

No Room at the Coup

First day after delivery by the post office

At the time of my last blog I had just received my order of Sebastapol geese and ducks and since then they have kept me running. I made the comment to The Man that I didn't remember this much time and work when I got my last order of 12 geese years ago. Then I remembered that my gander, Zeus, had taken the whole bunch and raised them himself. I had taken the little guys outside on the second day I had them and Zeus just marched in and took over and I never had to worry about them after that. (See my profile picture with Zeus) He raised all twelve and didn't lose a one of them. Zeus had a thing for me anyway so probably thought I had hatched out the babes myself. At any rate the 4 geese and 4 ducks that I have are running me ragged. They play in the water (no matter how I have it set up to avoid this problem) and soak all the bedding (which I have to change at least once a day). Maybe I was wrong about that diaper thing. Because I have been playing with them to get them to imprint on me  they scream their stupid heads off when they can't see me.  I can hear this all the way to the house. They also are growing amazingly fast.    
one week old
   I swear the geese are an inch taller every time I go out to the coup and that is several times a day. I take them outside for an hour at a time, weather permitting, and they follow me all over the yard. I have to be very careful not to step on one. The ducks are not as friendly but the geese want to be held and snuggled and are very curious about everything. The ducks just want to mess in a mud puddle. Being the momma duck I can't let them do that quite yet but I have taken them into a warm bath tub of water for a little swim. 5 minutes seems to be the limit then I spend 55 minutes drying them off  with paper towels and a heat lamp so I can take them out to the coup again. Ya! I guess I'm busy. I love them though. They are so much fun.

You may be wondering why there isn't any room in the coup. A week after I got the geese/ducks the feed store called to let me know my order for 6 chicks were in. I set up another box under the heat lamp and went to get them. My original plan was to let my broody hen have a chick or two. She had been setting on an unfertile egg for at least 20 days at this point so I put a chick under her and took the egg. She seemed baffled at this but willing to keep the baby under her wing. She also kept sitting in the nest so because I was concerned the baby wasn't getting any food or water I started changing it out with another chick every 12 hours and letting the chick that had been on duty eat and drink. She was showing no sign of getting off the nest. I finally decided she was stupid and put all the chicks back in the brooder and took her out to the chicken tractor to try and break the broody habit.  She fussed and clucked all day and that night I had to put her back in the coup so she would be safe from predators. At this point I had two large boxes on the eight foot table with various babies, a broody hen under the table on the floor with food and water, a flock of chickens in the other half of the coup doing their roosting thing with two out of the three silkies that were trying to go broody perched on separate perches. Any extra space was taken up with supplies like chick grit, chick food, extra water, a carry box for taking the water birds out for a stroll, fifty pound bags of layer pellets, 2 bales of bedding chips, scratch, light bulbs, poultry dust, assorted animal pharmacy items, an egg gathering basket, two portable dog carriers, etc. All of this in an 8 X 12 ft. building.

Last night I went down to check on every one just before going to bed. That stupid hen had found her way to the top of the table and climbed into the box of chicks. She sat on all six of them all night and is very proud of herself. This morning I moved her and the chicks to the dog carrier under the table along with food and water. She and the chicks seem happy so I guess I will just keep an eye on them.                                          


Wednesday, March 23, 2011

Duck, Duck, Goose.... and One Trick Chicken


The big day has arrived and all eight birds (4 geese and 4 ducks) made it in one piece which in itself always amazes me. All it would take is one postal or fed ex employee to drop the box or be a little careless. Much to their credit I have never had a dead bird show up in the mail. These little guys came from Metzer Farms in California and shipped from San Francisco or Oakland which can sometimes be kinda cold but the babies were packed with a heating pad and a container of Gro gel which was empty when they got here. Since it was loose in the box its hard to say if they ate it or dumped it over. As usual I got the call from the Post office at 6am which was fine since I hadn't slept much for two days. I was so sure something awful was going to happen to this batch of birds. It's been 5 years since I had Sebastapol geese and I was a little anxious to get them. The man stayed in bed this time while I went to get them and when I got back I woke up each of the girls by putting the peeping box next to their sleeping heads. Needless to say there was a stampede coming down the stairs to the kitchen where I was trying to give them their first drink of water. I had lots of help and the man decided there wasn't any sense in trying to sleep through that. They are beautiful birds and already I think I have picked out one of the male Sebastapols.

Many hands, light and happy work.


Remember the chicken with the broken, bleeding toenail that ended up in the house watching TV with The Man? Her name is Sadie Hawk-ins (She has a predatory look a lot like an eagle). She is at it again. This time with a little trick she learned all on her own. It's really kinda cute and she seems to love doing it. If I raise my arm up and pat it with my other hand she jumps up and sits there like some overgrown parrot. After checking out my clothes for any little crumbs that may be lingering there she actually settles down and perches. She likes to ride around the place like that and if I am not walking she will fall asleep. She is quite comfortable and it's her only trick....so far. She is way too smart for a chicken so I have to wonder what's up with that.

My last blog I wrote about trying to grow sweet potatoes this year. I made the assumption that sweet potatoes have very long vines that need to grow up something. However I can't find a thing on the web saying that is so. So if some of you southern sweet potato growers have that information drop me a line. Maybe the vines aren't as long as I thought. I will be trying Georgia Jets because of the shorter season. In the mean time I am in the midst of setting up my regular potato "pots" and growing three kinds. A purple potato called "purple majesty" a red "Chieftain" and my favorite "Yukon Gold". I will be growing a lot more of them this year not just because they taste better but also because I know there are no chemicals on them. Potatoes are on the list of one of the 10 dirtiest foods you can buy (unless its organic). No pun intended. You can also cook them so many ways that they never get boring.

Here is a question for you readers out there. Lately in view of recent events and with the specter of a food shortage, higher prices etc., (which I have already been noticing)  I have been wondering, what do other people store up in their pantries for that rainy day? Living on an island you have to sort of think about what you would do in the event of a catastrophe. You could be cut off from supplies for a while. And that includes animal food. Click on the comments button at the bottom of this page and shoot me a list of your favorites. Flour, rice, and beans seem to always be on that list. The Man suggested stocking up on lids for my canning jars. I thought that was a good idea. They are sometimes harder to get during canning season. So what good suggestions do you have?

Tuesday, March 8, 2011

Fifteen Days and Counting

Photo from Metzer Farms
www.metzerfarms.com


I'm talking about my order of Sebastapol geese and Khaki Campbell ducks. This time of year is always exciting especially when I have an order of birds coming via mail. It's kind of like waiting for Christmas or a new baby to be born. (Alright, so I am being Anthropomorphic)  Not at all like strolling into the farm co-op and buying new chicks. There is the preparation of arranging the nursery (brooding area) getting in the supplies, and looking ahead at what you need to do for when the little things grow up. Then you wait. Fortunately raising them is only a 3 or 4 month process as opposed to 18+ years, doesn't include labor pain or changing poopy diapers and satisfies my need to have babies around. I also don't have to worry about college funds:-). Right now I am in need of what I call the play pen.
This will be a fenced area off of the two current runs and coop area and will include doors from each run that I can open independently to allow birds from one or both runs access to a large grassy yard. It wont be as predator proof as the runs themselves because the birds wont be spending the night in it. Because I have predatory birds on my property it will be netted on top.(see Feb.12th post-Harbinger of Spring) Right now I have to be outside in the yard watching and listening  for hawks and eagles while my chickens are out in the yard. A play pen will allow all my birds access to grass and give me the opportunity to be doing other things without worry. If I am in the garden or otherwise working outside I can let them out to roam the property giving the play pen forage some needed rest. I will post photos of the new digs as we build it. Undoubtedly The Man will have some new fangled gadget that he will want to put on this. Can't wait to see what that will be. It's always a surprise. But then again,  maybe not.

I have decided to try and grow sweet potatoes this year and no I am not in Texas. I know we are not suppose to be able to grow them here but I have a plan. I am going to order slips from a seed company here in the North West that claims they have a variety that matures in 80-90 days. Using paper pots made by yours truly, (see last weeks blog) I am going to start them indoors. Then using the same technique I used for growing potatoes last year I will plant the started vines in the garden, pot and all when it warms up some. (I may rip off the bottom of the paper pot before planting). What I did last year for regular potatoes was create raised beds with chicken wire and straw. (See photo) To do this you take a length of chicken wire that will make a circle about two feet wide and wire it together to form a bottomless basket. Place the basket on the ground where you intend to grow the potatoes and pile good well draining composty soil mixed with bone meal in a hill in the center. Start lining the inside of the walls with straw pulling the soil up against the straw as you go and refilling the center as you need more soil until what you have is a wire pot with a straw liner and soil inside.This worked really great last year with my regular potatoes and when I was done with the pots the soil and decomposing straw made lovely friable soil for the garden bed. The only thing I did different was I dug a hole in the native soil the same size as the wire "pot" so there was more depth, put down a layer of good yummy soil and then planted the seed potatoes covering them with another layer of good soil. As they grew I kept adding straw and soil until the pot was fully line and filled in with soil. Each one of these "pots" yielded 15 to 20 lbs. of the best tasting taters I have ever had! But back to the sweet potatoes. They will need a trellis to climb and although I would like to grow them on the wire fencing the deer would just eat them. So I would rather tease and tantalize the little #$%&@  and keep them just out of reach. Using a wooden spacer fastened to the fence post I will put up another piece of wire fencing just out of reach of their cute little noses and grow the vines on that. Now that's the plan. We will see if it works. With the use of a dark mulch to warm up the soil I am hoping for the best.

Last but not least I want to introduce the latest member to our flock. Her name is Sophie and she is a white Silkie hen. She is integrating nicely and has learned quickly that when I call the flock to go in for the night she and the other two silkies can just wait outside the gate (instead of going in) and they will get special treats. Now all three beg like dogs for their share of the nightly scratch served separately. Perhaps they would like it on a silver platter with their tea?

Thursday, February 24, 2011

The Frustrated Gardener or (What to do on a snowy day in Spring?)


Alright, maybe it isn't really spring but I have been trying to push it. I have even been out in the garden weeding and cleaning it up and just trying to get ready for when I can really do something serious there. So today? What to do? Make paper pots for starting seeds. Really very easy.

First find a can of something with a diameter the size you want to make your pots. It shouldn't be more that about six inches since that would probably be more of a challenge than you want to deal with. In fact if you need six inch pots use the bottom half of a paper half gallon milk container with the top cut off.


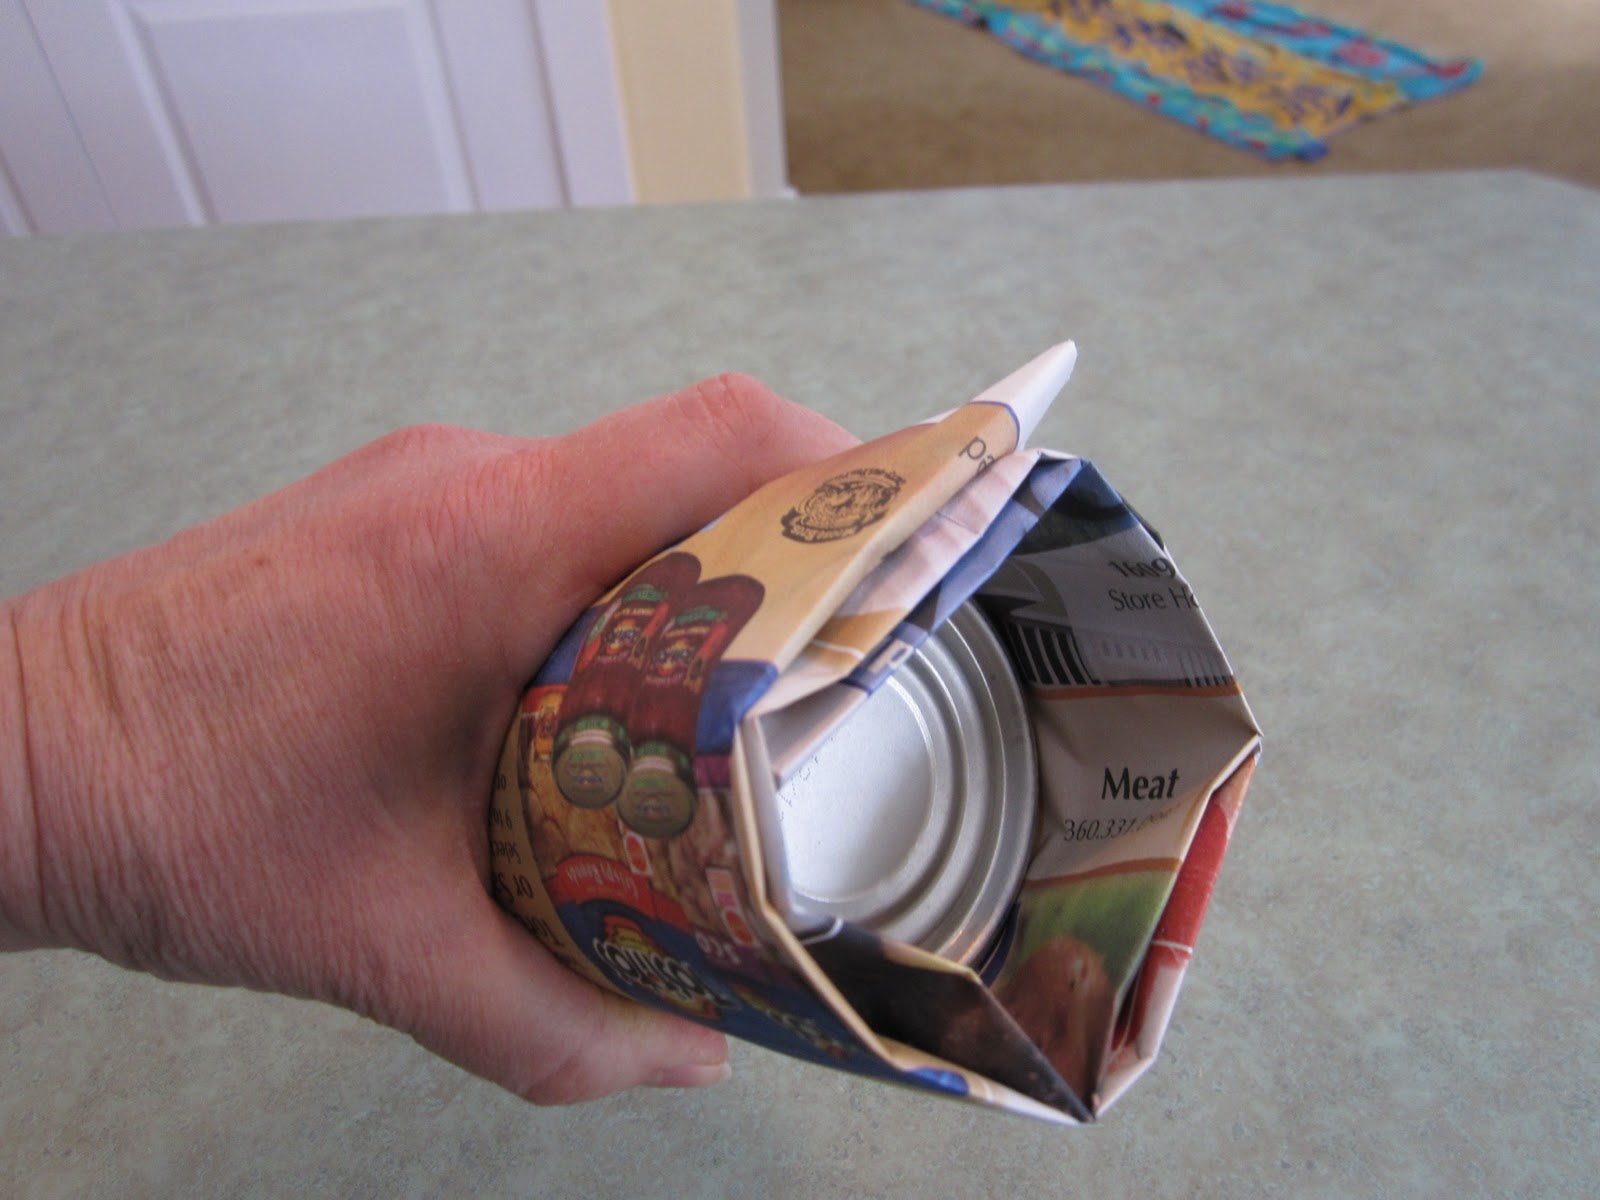
 My favorite size can was a can of pineapple. Take one sheet of newspaper and lay it flat on a table. Don't unfold it.  Fold it in half again length wise so it is about 5 inches wide and 30 or so inches long. Take your can and set it on the paper so there is about 1 1/2 inches of paper hanging over the bottom. Roll the paper up jelly roll style around the can until the paper forms a tube. Tape it together to hold it. Fold the overlap over the bottom to form a pot and dampen the paper. Set the can upright and push down on the paper bottom to get a good crease. Now you can either slip the paper pot off the can or leave it on until it drys.  When dry, fill with potting soil and plant your seeds. Make sure you set your pots in a water proof tray so you can water them without ruining your window sills or where ever you have them setting. When your plants are ready for the garden, just plant them paper and all. It will decompose and add to the compost of your soil. You can open up the bottom of the pot if you want to just to give your plant easier access.


So I am sitting here watching the snow come down and thinking maybe I should go start a new jar of sprouts. At this time of year it is the closest thing to having fresh produce as I can think of since I don't have a greenhouse. Simple to do too if you have a wide mouth canning jar. Make sure to sterilize the jar. You can get the sprouting seeds in the bulk food section of many grocery stores or your local food co-op. Soak 1 1/2 Tbls. of seed in water over night. Drain the next day and let them sprout in your window. Just make sure you rinse them 3-4 times a day to keep them healthy to eat. They will take about 5 days to grow. You can get a screened jar lid from your co-op store or just use a paper towel rubber banded to the rim of the jar between rinses to keep dust out. When they have reached good size you will want to dump them into a big bowl of water and skim off the hulls and unsprouted seed.

Maybe next year I can convince the man to build me a greenhouse.

Saturday, February 12, 2011

Harbinger Of Spring

Beware the eyes of ...... POTATOES! Yes the spuds in my garage are growing eyes. Looking for fertile ground in which to grow their offspring. I can't wait. The potatoes I got out of the garden last year were the best I have ever tasted and I knew there were no chemicals on them. The farm co-op had potatoes already so I bought mine. Last year I waited and had to take what they had. This year I bought Yukon Gold, Purple Majesty, and Chieftain (buttery gold, purple, and red potatoes respectively). I can taste them already.


Another sign of spring? Apparently the first three months of the year we have a type of  hawk (a small one fortunately) that spends time in this neck of the woods. We had a very close call with one yesterday. I happened to look out of my kitchen window as I so often do to check on my girls, just in time to see a small hawk take down my little 1 1/2 lb. bantam rooster. I don't think I have moved that fast since my kids were tiny and in trouble. I was out the door, across the deck, and to the edge of the property in a flash. That nasty little bird was dragging my poor boy across the ground in an attempt to get his "dinner" away from the screaming, crazy, WILD thing coming at him. It left without its meal and I picked up what I thought was going to be a very dead rooster bleeding and in shock. Needless to say he ended up in the house where I cleaned his wounds and kept him warm until he regained his composure and his balance. He wasn't walking too good. Kept falling on his face. After spreading a towel out we propped him up with rolled towels on one of the kids beds. And carefully fed him water with a medicine dropper. Would you believe that tough little guy was outside bossing his ladies around an hour later? He does have some battle scars though. He is missing quite a few feathers at the base of his tail and his comb and wattles are bruised and bloody. (you can click on the pictures for a closer view) I think I will keep the flock closer to the house for a few months and not let them out of the run unless I am with them in the garden. That will make them mad at me but better than being bird food.

So the last post I was about to make a prime rib roasted in Kosher salt for Candlemas. Well it turned out so yummy that I am doing it for Valentines day. I even got feed back from a parent of one of the kids friends that was here for that meal. Guess she went home raving about it. The next roast is almost twice the size. It is really very easy to do. Especially if you have an oven with a meat probe that keeps track of the internal temperature. My family likes beef rare. So I cook it to an internal temperature of  125 degrees then take it out and let it sit for 20 or 30 minutes with a piece of foil over it and a tea towel. It keeps cooking, sets the juices and comes out perfect. 135 is medium rare. Here is how its done.
Buy a prime rib that has had the bones cut off and re-tied back onto the roast. Set the probe in the roast according to manufactures directions. (If you don't have a probe you will have to use a meat thermometer near the end). Using a pan that is at least 3 to 4 inches deep pour a thick layer (1 to 2 inches) of course Kosher salt (not table salt) and set roast bone side down in it gently seating it into the salt. Pour lots of salt over the roast building up the sides until the meat is completely covered. You can use a little water sprinkled on the salt to help pack the salt on. Just cover the roast kind of like burying your spouse or significant other in the sand. (ha)! Roast at 325 degrees for 10 to 15 minutes per pound or until your thermometer registers the correct temperature.

This sounds like a really scary recipe to try especially with such an expensive cut of meat but it is really easy and really yummy. There are a lot of recipes on allrecipes.com/ Just search salt roasted or salt encrusted prime rib. Some cook it longer at a lower temperature and some higher for a shorter time. Some even season the roast before burying it with things such as Lipton onion soup mix. I wont go there but I did season mine with an apple wood smoked salt and some fresh ground pepper. So here are some pics of my roast. YUM!


Make sure you take all the salt off before slicing and serving. Really worth a try so DO IT!
P.S-Did you know you can click on any of these pictures to see them larger? Let me know how yours turns out.
Next post I will be making pots for seed starts. I want a little jump on the tomato season this year.

Thursday, February 3, 2011

Candlemas and Sebastapols


Before I get going on this post I just want to thank every one that responded with book and movie titles. I now have a replenished list and more to learn.

Some years ago on one of my BIG birthdays I decided to never have another birthday. Instead, just to appease those who insist on doing something to commemorate this joyous occasion, I found another holiday to take its place. It isn't that I don't appreciate being thought of on that special day. I just refuse to get any older. If you go looking for holidays you can find something listed on nearly everyday of the year. My birthday just happens to be on Candlemas. Now I suppose some of you are asking just what is Candlemas? It is supposed to be a celebration of new beginnings. There are several ways to do this some Christian in origin some tied to agriculture and some the black arts. You can find lots of different explanations on the internet. The one I like the best is Pennsylvania Dutch in origin. This day is the half way mark between the Winter Solstice and the Spring Equinox and in many traditions is considered the beginning of spring. Celebrating the awakening of the ground, new beginnings, germination of seeds, end of winter etc.  It is also where the ground hog tradition came from. I can handle that. Since I am a gardener I like the new beginning thing. According to my brother it is also a time when covens of witches initiate new members. Maybe he's trying to tell me something?  I think I will leave that last one out. To commemorate the occasion you can put candles in the windows, eat pancakes, and start seeds indoors. I put candles in the windows at Christmas time so I just leave them there until the day after Candlemas. Thank you electronic candles. Pancakes made from last years grain harvest are suppose to symbolize the sun and abundant crops or something. My brother is making me a waffle brunch that day and that is close enough to pancakes for me especially since I like waffles better. Since pancakes are suppose to symbolize the sun lets hope his waffles are round.
 Lummi Island geese
My Sebastapol
What I am really excited about is ordering this years birds from a hatchery. I have all the chickens I have room for so I am going to finally get Sebastapol geese. I will most likely get some ducks to fill out the order and my two mallard Khaki Campbells will get some girl friends but the geese are what I really want. I had a pair of them when I lived on Lummi Island. One of them is happily living on a beautiful farm on Lopez Island and I am thankful to them for taking her (and the other three regular geese) in since she had a bad leg. (which miraculously healed overnight when all the other geese on that farm were re-homed). Little faker.... Hate to mention to the man that there may be a honey do in his future. I may need a bigger pen to keep them all safe at night or when I'm not home.

I have decided to order my birds from Metzer Farms this time. They are located in California and have some beautiful birds AND I can order sexed birds! If you are interested use this link.
http://www.metzerfarms.com/SebastopolGeese.cfm?Breed=Sebastopol&BirdType=Goose&ID=SEB&CustID=212097
You may even get John Metzer answering your phone call like I did the other day. Nice to see a business owner that is truly involved and willing to do the same things asked of his workers. I like that.

Sebastapol geese are the gentlest most beautiful things ever. If you want to see some stunning pictures of these geese I highly recommend everyone to see the pictures taken at Cottage Rose Birds and Blossoms. These pictures must have been taken professionally because they are beautiful. Just click on the link here http://www.freewebs.com/cottage_rose_birdsnblossoms/ then click on White Sebastapol in the menu located under the header.

So I have decided also to make my own Candlemas dinner. We will have a prime rib that I have in the freezer (bought on sale) roasted in course ground kosher salt. I've done this once before and the roast was to die for. A restaurant I worked for use to do this and prime rib night was always sold out. Seldom did the employees ever get a taste.

I'm also going to do a new salad. Recipe follows. If the roast turns out I will post that on the next blog along with pictures.

Spinach Salad with Cranberries and Warm Honey Dressing
  1/2 lb. bacon, chopped
baby spinach leaves, washed (about 8 cups)
4 hard boiled eggs, sliced
1 cup shredded swiss cheese
1/2 cup lightly toasted pecans
1/2 cup dried cranberries
3 Tbsp. honey
3 Tbsp. cider vinegar
1 cup sour cream
Salt and pepper to taste

Saute' bacon until just beginning to crisp. Remove bacon to paper towel to drain. Reserve 1/3 cup of the drippings in the pan.
     Arrange spinach on individual serving plates or put in a serving bowl. Place egg slices over the spinach and sprinkle the cheese, bacon and pecans over the spinach.

Dressing
     Place the pan with the bacon drippings over medium heat and then heat the honey in a microwave oven until melted. Stir the vinegar into the honey then slowly stir the mixture into the bacon drippings. Remove from heat and gradually stir in the sour cream. Season with salt and pepper. Immediately pour over arranged salad, garnish with cranberries and serve.

This salad was really yummy. Even the kids ate it.