Wednesday, September 26, 2012

A Winter Garden? Everyone Should Have One

Last years Cheddar Cauliflower 
Ok. I know your tired. Fall and winter you are looking forward to a little down time and book time, holidays, etc. But if you happen to think about it you can get a fall garden started. It is just a little bit closer to being more prepared and self sufficient. I have chosen to put in some basics for the winter. Cauliflower, three different varieties of broccoli, beets, carrots, lettuce, and maybe some spinach. Although I think I am a little late for the spinach I will try it in my cold frame.

Here in the Northwest cool weather crops are the only thing that will grow with a little protection. I don't want anyone to think I am some expert because just about everything I do is an experiment but I have had some pretty good results. Last year I grew broccoli, brussel sprouts, and a variety of cauliflower called Cheddar that was to die for. I also grew a variety called snow crown with terrible results. I didn't know you had to "blanch" cauliflower or that there are self blanching varieties. I didn't even know what blanching was but I do know it doesn't mean using hot water.  Apparently when cauliflower gets to be about baseball size you are suppose to wrap the leaves around it and hold it in place with something like string. This protects it from the sun and helps it turn white. Turning white was not a problem for me. Knowing when to harvest was. Harvest when the heads are about 6 inches in diameter otherwise they get a ricey look and are past their prime. Since I lost my cauliflower to hard frost I think perhaps this is a better reason to blanch.

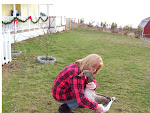
This year I put in some simple raised beds to make the job a little easier and to battle the constant crappy soil. I bought three pieces of 2 x8 x8 foot Douglas fir and cut one in half for the ends so the bed would be 4 ft. by 8ft. I didn't want to use treated lumber and cedar was just too darned expensive. So following the lead of my friend Cindy, I applied boiled Linseed oil to all surfaces and let it dry then had the man screw it
Beets in the foreground carrots in the back
together for me with 2x2's in the corners. I filled, fertilized, and planted beets and carrots in it and did it in August. A little late for beets so I chose a fast maturing variety called Merlin (55 days) and another that I had in my seed file called Chioggia (65 days). Beets and carrots were direct sown into the first raised bed about mid August. Although I had doubts about the beets due to the late planting they are doing great. I planted thick enough that we have had two meals of beet greens. Not bad for a four foot square planting. During August in spite of my attention to watering, my beets would wilt slightly during mid day. Too much sun. So I placed a piece of 4 x 8 lattice on the west side of the raised bed held in place with three metal fence posts and plastic ties to hold the lattice to the post. Worked perfectly. No more wilting. My carrots need thinning but look great. The beets have formed little one inch beets already. The only thing I would do differently is not use so much compost. I can see the beet roots are going to be somewhat hairy.

 Around here you need to plant your fall and winter gardens in late July and August to allow for adequate growth prior to the onset of fall. The difficulty comes with the fact that you are planting cool weather crops and it is still hot at that time of year. So it is very important to water, water, water. If you let broccoli and cauliflower dry out even once it will bolt instead of growing. Because I was building the rest of the raised beds at the time I needed to be planting them I opted to start the Cole plants in pots on my patio. My patio gets morning sun until about 1pm then it is in shade the rest of the day. A perfect place to start cooler weather plants. I also put the pots in flat pans so that the pots could sit in a 1/2 inch of water lessening the possibility of drying out when I forgot to water. When transplanting be very careful to not disturb the roots as this will cause a set back in growth.

I went ahead and put in two more raised beds that were 4x12. These I am using for the Cole crop and because I grew the plants in pots I had a ready made garden as soon as I was able to fill the bed with soil. This time I used a three way mix from the local soil company.

One of the things I don't like about Cole crops is the green caterpillars and aphids. The caterpillars are the larvae of the white cabbage moth or butterfly.
You will see them flitting around your garden looking for a spot to lay their eggs on your lovely broccoli. Brussel sprouts seem plagued with a grey aphid. Both are a real pain. The caterpillars can be controlled with a couple doses of BT but not only do I not relish the thought of eating that stuff no matter how harmless I also don't like paying for it. So I came up with this idea. As soon as I plant the broccoli, cauliflower, and brussel sprouts I cover them with nylon netting that I purchased at the fabric store last year. Not to be confused with tulle. It's cheaper than row covers or tulle and does the job. (Tulle also blocks more light than the nylon netting.)  Not one greenie meanie. Last year when it got cold enough that the butterflies where no more I took the cover off. Unfortunately the grey aphid attacked the brussel sprouts when I did so this year I am leaving the cover on all winter. According to my companion planting book Cole crops do well with onions so I planted some bunching onion from seed between the broccoli and cauliflower in the hopes of getting green scallions for the winter.  They are just starting to come up and are about 1-2 inches tall. Nice thing about planting in the fall is everything seems to germinate faster and better. The bad thing about my set up is the onions skinny little spikes want to grow up through the netting because it is just gently laying on top of the Cole crop. So I placed some hoops to hold the netting up off the soil. I sure don't want those onions to grow through that and have to either cut them out or rip them off. In general I am pretty happy with the job I have done so far. I will plant the cold frame with lettuce and spinach and then relax a little and just do some clean up and weeding and putting the rest of the garden to bed for the winter. The chickens and ducks will be invited in to the garden to clean out any lingering pests. Then I can get started cleaning and winterizing the coop. Guess I wont be relaxing after all. Hmmmmm.

Sunday the oldest came home with her boyfriend to partake in a small family tradition. We celebrate the first day of fall with a family dinner. We had a pork roast on the rotisserie and a Caprese salad, acorn squash baked with butter, brown sugar and a slice of bacon, Zucchini and potato fries then topped it all off with home made pumpkin pie. We even had a little goat milk ice cream. All out of our garden and home made. (The goat milk was from a local farmer) Of course I forgot to take a picture so here is a picture of the table instead. Both of our girls start school the next day. First day at junior college for the youngest and first day as a junior at the University for the oldest. There are many things to celebrate.

http://homesteadrevival.blogspot.com/2012/09/preparedness-challenge-39.html#comment-form


Friday, September 14, 2012

Potato Harvest


Sorry it has taken me so long to post. I think I have several subjects simmering and waiting to be written about. I will get to it. Most of you remember how I made potato towers last year out of chicken wire lined with straw and filled with soil.  (see here) This year I used the many paper grocery bags that I got from the grocery store as liners. They were a lot easier and quicker to put together. (cheaper than straw too) I planted 9 towers with three seed potatoes in the bottom of each one adding a liberal amount of bone meal (my dog Lucy was convinced I had buried bones and was very confused). I covered each with about 3 or 4 inches of soil and waited. When the plants started showing up I started adding more soil to each tower. I kept doing that until the towers were filled and I ran out of soil.  I also placed a layer of straw mulch on the top of each tower when I was finished filling them. This allowed me to water less. Over watering potatoes can lead to rotting and I think less is more. I watered well when I first planted and then left them mostly alone watering only if and when they got dry. I think if the towers had been five feet tall those plants would have just kept growing. As it was each tower was about 18 inches to 2 feet high, the width of a grocery bag. Those potatoes grew so well that the spuds were poking out of the top of the soil. Needless to say we had several meals with those potatoes. It was fun to trek down to the garden just before starting dinner, put on a glove and shove my hand into that nice soft soil and yank out a big fat potato. Several dinner guest got a kick out of doing that too.
They were growing so well that I finally just had to bend the plants over and stick them inside the tower to get them to quit growing! This also shaded the potatoes that were trying to jump out of the soil. After leaving them for two weeks to age (this allows the skins to set and increases storage ability) my daughter and I harvested two banana boxes of them by simply lifting the wire up and letting everything fall to the ground where we could sift through it. Now this is a kid that doesn't like gardening but she kept saying "Oh! Potato!" every time she picked one up. Well almost every time.  I had planted both red Chieftain and Yukon Gold. I don't have a scale so if I had to guess I would say we had about 30 lbs that we harvested and at least 15 more that we had already used. Not bad for an investment of less than 30 seed potatoes. Some had been saved from the previous year.

I have tried several methods to grow potatoes and so far this is my favorite. I think the fact that the towers are lined with paper or straw allows the plants to "breath". I have tried growing in buckets and garbage cans but this works the best so far. I save the chicken wire baskets from one year to the next so once they're made your good and they can be flattened for storage. The towers keep the chickens from scratching in the soil and this allows me to grow potatoes outside the garden fence extending the total growing area of the garden and killing the grass so that the next year I can extend the growing area without killing myself removing the turf.  The deer so far have left the potatoes alone.

Potato trench. Click to enlarge
I was very late planting the russets and they went in in July. I ended up making one russet tower outside the fence and the rest of the russets were planted in a trench inside the garden fence. That trench was line with chicken wire, a thin layer of straw,  then potatoes were lined up in the trench on top of the straw and covered with soil and bone meal. I used the soil that had been dug out and placed on the sides to hill up as the plants grew. The idea is to be able to harvest the potatoes by pulling the wire up. We will see how that works. I was about 2 months late getting those in so they are still in the garden and the geese ate all the leaves off of the russet tower last week so who knows how that will be.

I use to think growing potatoes was a waste of time. After all they are usually relatively cheap at the store.  I was wrong. There is no comparison. A fresh potato actually cracks like a fresh apple when you cut into it and the taste is amazing. Plus what else can you plant in the garden that can give you such a calorie dense return? Maybe carrots? Potatoes are fun to grow and add a lot to your self sufficiency. Next year I think I will try taller towers.

What I learned this year?
1. Potatoes will not grow in wood chips even if they are full of chicken poo. I had been dumping the wood chips from the coop in the area that I was going to put towers to help kill the grass. I noticed that not one potato had rooted in the chips.

2. Towers allow the potato plants to breath. I think that garbage can trick is a myth.

3. Use bone meal. Apparently potatoes are a potassium rich vegi.

4. Don't over water!

5. Plant early.

6. There is no potato like a fresh potato.